Showing posts with label Azure. Show all posts

Saturday, January 19, 2019

Targeted Alerts Using Azure Event Grid

I came across something interesting the other day while trying to refine a governance strategy for Azure at an enterprise level.  The specific scenario is centered around an organization that has a very large Azure estate with many virtual machines as well as a wide swath of platform-as-a-service components.  We had seen some upticks in password resets coming from the Azure portal for VMs, and didn't discover this until we decided to go in and audit some activities.  When looking through the Activity Log, these types of activities aren't immediately apparent as they display as deployments instead of password reset events.  After digging through the event metadata, I was able to locate a common convention for these events--under the authorization section of the event details, the scope value will end with "PasswordReset" and the timestamp it was initiated.
This got me thinking...it would likely be good to capture this and alert operations if anyone is using the Azure portal to reset VM credentials.  Typically the account that is reset using the portal will be an administrative non-domain user, and multiple resets may indicate a larger issue.   But what is the best way to alert on this activity?
Using Log Analytics is one approach to solve this problem.  To start with, you will need to add the Activity Log to the list of data sources for the Log Analytics workspace.  Depending on how large the subscription is, and how active people are in that subscription, this can mean a large amount of data.  When using a per-gigabyte instance of LA, you may end up seeing a large usage charge related to importing all of this data.  Getting the information using a LA query is not terribly difficult:

AzureActivity | where Resource contains 'PasswordReset'

From there, you can wire up an Azure Alert to fire when this condition is met.  Again, this operates on the premise that you have imported all of the Activity Log data into your LA workspace.
Another option, one that I found to be more interesting, is to use Azure Event Grid to listen for specific messages and fire when the intended message is found.  To set up an Event Grid subscription, you can use the Azure portal, Azure PowerShell, or Azure CLI.  One caveat here is that the ability to use complex filters on event subjects is not supported currently when using PS or CLI.  You can use a "starts with" or "ends with" filter, but nothing that captures something akin to "contains".  The use case I'm after here looks to use a wildcard operator to find the phrase that pays within the event subject, in this case "PasswordReset".  The only way to create this type of filter currently is to use the portal.  During creation you can specify the type of action to take when the event subscription picks a winner:
  • Web Hook
  • Azure Storage Queues
  • Event Hub
  • Hybrid Connections (Azure Automation)
Before we rush to get the event subscription created, let's take a moment to think through the mechanism that will send the alert.  Using a serverless component such as a Logic App or Azure Function could be an easy way to tee up an email to the ops team.  For the purposes of this example, using a serverless component will rule out the use of the Hybrid Connection endpoint.  While actions can be invoked from Storage Queues, I want to explore using an Event Hub as the recipient of these messages.  Both Logic Apps and Functions have triggers for receiving events from Event Hubs, and setting up a new Logic App to handle these events should be fairly straightforward.  Why Event Hubs, though?  My thought here is that using Event Hubs will allow me to send multiple types of messages to a Hub, and with low retention settings as well as lower per-transaction cost, it seems like something I should at least try out, right?
Let's start by creating the Event Hub namespace, along with a hub.  The simplest way to do this is to use the Azure CLI to create the namespace, then the hub.

az eventhubs namespace create -g rg-shared-services -n governance
az eventhubs eventhub create -g rg-shared-services --namespace-name governance -n auditalerts


You can set the message retention here as well using the --message-retention flag, as the default setting is 7 days.

Once the namespace and hub are created, we are ready to set up an Event Grid subscription that will push specific events to the hub.  In the Azure Portal, go to All Services -> Event Grid Subscriptions.  The screen below will display.


To create a new subscription, click the "Create one" button if you have no subscriptions already, or click the "+ Event Subscription" button in the command bar.  The next blade that appears will have basic information.  Enter in the information as seen below.  Keep in mind that you will need to select Subscription Events from the dropdown for Topic Details, and Event Hubs for the Endpoint Details section.  You will be able to specify the auditalerts hub once you select the appropriate Event Hub Namespace.


Next, click on the Filters tab.  This will allow you to set filters on the event subject in a basic way (starts with / ends with) or in an advanced manner.  We are after the advanced filter since we intend to use a wildcard search term.  Click on "Add new filter" to add a new advanced filter.


 In the Key field, type in "subject".  For the Operator field, select "String contains" from the drop down.  Then, click on the area that says "Add new value" to enter the filter expression.


In the text box that appears, type in "PasswordReset".


Click "Create" to create the subscription.  This will now send a message to your Event Hub whenever a password reset happens via the portal.  To finish the job, you need to create a Logic App that will listen for activity on the hub and send an email when it receives an event.  You can create a new Logic App in the Azure Portal directly, or by using Visual Studio with the Azure Logic App Tools for Visual Studio extension.  Once you have created a new Logic App, search for Event Hubs in the trigger section and add the "When events are available to Event Hub" trigger. 


You can choose the polling interval for whatever you like, and it will default to 5 minutes.  For extra granularity, you can add a Parse JSON step and parse the event.  To get the schema for an event, copy any activity from the Activity Log and enter that into the popup you receive when clicking on "Generate schema from sample payload" on the expanded JSON task.  After this, you can add a task for Office365, Exchange, SendGrid, or any other email provider you wish and add the details from the event to the body of the email.  Include any email addresses (individuals or distribution lists) that need to be informed. 
To test, use a test VM in the subscription where the Event Grid subscription was set to listen.  Reset the password for the VM using the Portal and wait for the email to be sent out.  It will not fire immediately, so do not be alarmed if you aren't immediately emailed.

That's all there is to it.  You can expand this to include routing to Event Hub consumer groups or even use Event Grid Domains to further expand your reach.  Happy eventing!

Tuesday, February 3, 2015

Migrating TFS to VSO: A Whitepaper Walkthrough

Recently I was fortunate enough to work with some fellow Visual Studio ALM Rangers on a whitepaper detailing the migration of an on-premises Team Foundation Server (TFS) instance to Visual Studio Online (VSO). It’s a good read and the team did a great job putting the narrative together so that it’s easy to follow along. Check it out here: TFS to VSO Migration Walkthrough
Candid feedback is welcome!

Monday, December 8, 2014

Developer VDIs – Options for Throwaway Workstations

We all know that computing hardware is improving and transforming at a steady and fast pace.  This allows us to do things as developers that even three years ago were quite frankly impossible.  One concept that I’ve run into on more than one occasion is that of the Virtual Desktop Interface (VDI). Typically when talking about VDI, one may think of an enterprise environment where everyone has this apparition in the ether of the company’s hypervisor that is their desktop “computer”.  I am not referring to that traditional VDI model.  What I’d like to talk about is developer-centric VDIs, configurations that allow developers to push, test, monkey with, and even destroy virtual machines specifically for proof of concept or other development purposes.
I’ve known plenty of developers who prefer to keep their primary machines “clean”, with no additional goodies outside of an MS Office suite installed.  They instead rely on virtual machines or VDIs on which they write code, compile, test and even deploy to a dev environment.  Within the past two years, a few vendors of interest have shown up, each boasting different capabilities.
Vagrant.  Vagrant is truly a developer’s VDI engine.  It follows a common theme of having images available for download that a dev can then customize if appropriate.  Its main dependencies are on Oracle’s VirtualBox and Ruby, so it can be run on almost any platform.  There are images out there based on Windows and even OSX, though I wouldn’t trust them simply due to licensing issues.  Linux remains the main OS for this particular tool.
Docker.  While Docker is more often thought of as an application deployment mechanism, one of the more popular use cases for it happens to be in implementing IaaS solutions. This means any Docker images could be used to store basic developer needs, and containers could be spawned to allow a developer to perform work without managing a hypervisor or other related resources.  Docker runs natively on Linux, but requires help from VirtualBox on both Windows and Mac OSX.  Another reason to take notice came in the form of an announcement concerning Microsoft’s partnership with Docker and plans to include native support for Docker in the next version of Windows Server.
Nitrous.IO.  This offering is a bit of a different animal, as it’s a free-to-start cloud VM solely for development.  The VM provided is a GNU Linux shared instance with either Node, Ruby, Go or Python installed and configured out of the box.  You can purchase more resources, but in most cases the supplied defaults are enough to do quick prototyping.  Since it’s online, you can push any changes to your distributed SCM system of choice for more concentrated work later.  You can quick preview on a couple of externally-facing ports as well, which makes having a PoC demo really easy if you have stakeholders in disparate locations.
Azure.  Yes, I said it.  If you have an MSDN subscription you are able to get guest OS images that include Visual Studio pre-installed.  For any company with an enterprise Azure subscription and MSDN subscriptions for developers, this is almost too good to be true.  Granted, there are charges for using the VMs, but given the ease of creation/de-allocation and the level of support, it’s truly a great option.  Integration with Visual Studio Online, Application Insights and the litany of other Azure features makes this an excellent choice as well.
Of course, one of the best features of any of these options is the ability to roll back or blow away a machine if something gets misconfigured, corrupted or is otherwise bothersome.  While you can do that with a physical workstation, it’s often frowned upon, especially in shops that have restrictions around what you can (and can’t) install on company hardware.  Sometimes having a disposable environment allows for more experimentation, which could lead to your next big development breakthrough.
Until next time…

Friday, November 21, 2014

Making the Case for Visual Studio Online

Recently I posed a question to our application development team related to switching from our current on-prem TFS instance to using Visual Studio Online.  In making my case for using VSO, I brought up the following points:
  • Feature previews and reduced maintenance. When new features are available for Team Foundation Service or VSO, they are enabled in the VSO portal at no charge. In addition, patches and upgrades are automatically applied, so your days of hoping that installing that service pack didn’t hose up anything are long gone.
  • Easy to use interface.  The VSO dashboard gives you a nice overview per collection and per project, making it easy to see build metrics, task boards and other collaborative features.  Many of the same conventions that you find in the TFS source explorer can be found in a clean web-based interface.
  • Free version.  VSO is free to use for teams of up to five developers.  Additional stakeholders (read-only users) can be added at no charge.  Any MSDN subscription holders can also be added to VSO at no charge, which may come in handy should you need to keep extra “free” user slots open.
  • Solid SLAs.  The current SLA for VSO is 99.9% uptime.
  • Tie-in to Azure.  VSO is an option that can be linked into your Azure account, which makes it possible to use other services (i.e. Application Insights, VMs) in conjunction with code.  These services do cost more.
  • Free build time and load testing.  Even with the free version, you are allowed 60 minutes of build time per account, along with 15,000 virtual user minutes for cloud-based load testing.  While the build allowance might keep you from doing CI-type builds (build on each check-in) for high-intensity projects, the load testing feature is definitely adequate for experimenting with an application’s ability to scale and perform under pressure.  Ex: If your load test consists of 250 concurrent virtual users, you will be able to run this test for a total of 60 minutes per month.
  • Access anywhere.  This one’s more obvious, but with VSO you can access code from anywhere, where the on-premises TFS usually requires you to be VPN’d into an internal network.
A colleague, rightfully so, brought up concerns around security.  After reaching out to some resources in the ALM community, I was presented with some great information to speak to security measures.  Some great points to consider include:
  •  Simply put, VSO is TFS running in Azure.  Any security certifications that apply to Azure also apply to VSO.
  • Azure currently has ten independent security certifications, including HIPAA, PCI and FERPA.  You can read more about those certifications at http://azure.microsoft.com/en-us/support/trust-center/compliance/.
  • User security can be managed by Azure Active Directory.  In addition, your company’s AD entries can be synchronized with Azure AD, making adding and removing access much more streamlined.
  • Microsoft currently uses VSO for both Visual Studio and Team Foundation Server products.
I hope you find this information useful in deciding whether VSO might be a fit for your team.  Special thanks to Esteban Garcia, fellow ALM Ranger and ALM MVP, for his help around those security questions!

Thursday, November 6, 2014

The Five Minute Service Bus

In our last quarterly meetup, I presented this notion of being able to create a service bus architecture in about five minutes.  “Inconceivable!” some might say.  Others may not, depending on how brazenly they wish to infringe on copyrighted material.  In any event, it can be done, and here’s how.
First of all, you need a plan.  My concept was very simple: I wanted to have some sort of front-facing API, likely productized, that would communicate with a service bus in the cloud using message queues.  There would need to be some sort of dispatcher in the cloud, equipped to move messages to the appropriate places.  This needed to include error handling and basic logging.  Finally, as part of the error handling process, I wanted to send an email to an applicable party regarding the error.  My dreadfully simplistic design looked like this:

Figure 1- The “big idea”.
An alternative idea to using an SMTP service to convey error messages could also be setting up topics within the service bus, and writing new messages to those topics so that subscribing applications could consume them.  I chose to use only the SMTP service for the sake of simplicity.
Following are the steps you can follow to create the prototype that corresponds to this design.  This assumes that you have a valid Azure account, whether it be a free trial, pay-as-you-go, or enterprise subscription.  You also need to have the Azure SDK installed in order to gain access to the appropriate project templates.
1. Create a new Service Bus namespace.  This can be done directly in the Azure management dashboard or in Visual Studio directly through the Server Explorer.  If connecting through Visual Studio, you will be presented with the following dialog.

Figure 2- Add Service Bus Connection
Filling out the requested information will create a new service bus namespace for you in Azure.   You could opt to create a Service Bus for Windows Server connection also, though for this example we will solely be leveraging Azure.
2. Create the queues needed. You can do this directly in the Azure management dashboard as well, but for simplicity’s sake, you can also do this from the Server Explorer window by connecting to the service bus namespace, selecting Queues, and right-clicking to select Create New Queue.

Figure 3- Add New Message Queue
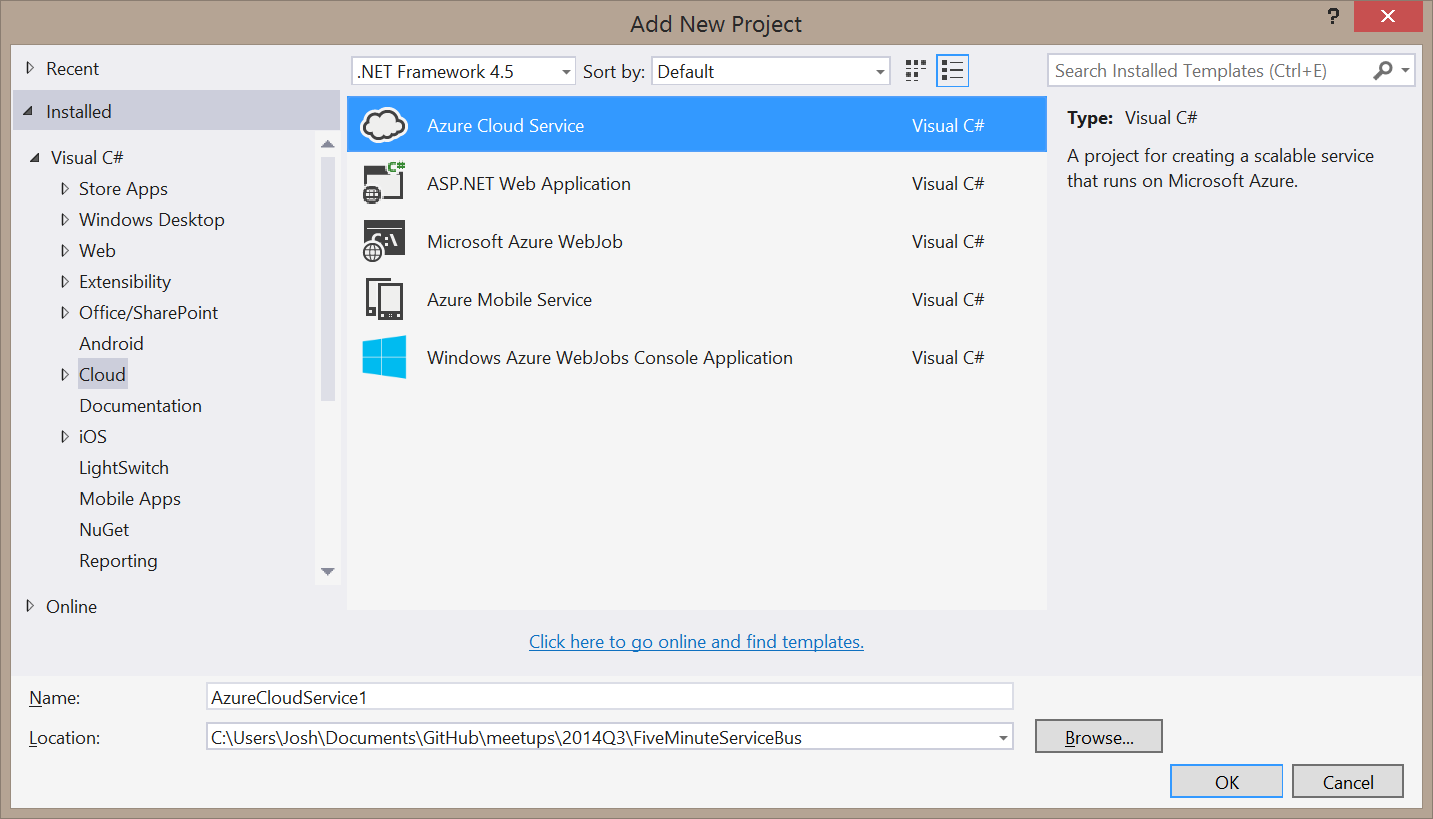
3. In Visual Studio, create a new Cloud Service application.

Figure 4 – Creating the Cloud Service
4. During creation choose the option for a service listening to a message queue.   Click on the pencil to edit the service name.  This will create a new Worker project that corresponds to the role you created.

Figure 5- Adding a Worker Role with Service Bus Queue
5. Right-click the Cloud Service project, and add a new role.

Figure 6 – Add a new Worker Role Project
6. Repeat step 5 for the logging role and the error-handling role as well.
7. Add appropriate code into the actions for the dispatcher, logger and error handler.  The code related to the dispatcher is shown in Figure 7.

Figure 7- Dispatcher Code
For the error handling code, please see Figure 8, as it uses the System.Net.Smtp.SmtpServer class to create a relay point using Google Mail.

Figure 8- Error Handling Code
8. Using the Messaging With Queues sample code as a base, create a simple console application that will write messages to the dispatch queue.
9. Run the console application and monitor the results.
Again, this is an oversimplified example, but it is functional and able to scale should you see fit.  To play around with different options, feel free to download the code from our GitHub repo.